Article:: Stationery 101: The Essential Glossary & Guide
Stationary 101:
The Essential Glossary & Guide
By Megan Kattengell, Owner of Camellia Memories
Your wedding stationery is more than just paper–it’s your guests’ first glimpse of your celebration, so the design should capture the heart of your special day. Beyond that, it serves a vital logistical purpose: giving your loved ones the details they need to be present and to enjoy celebrating with you.
But sometimes the world of wedding stationery can feel like learning a new language. Terms like “letterpress,” “deckle edge,” and “semi-custom” are thrown around, and knowing when to order what can be overwhelming.
To help you navigate this flurry of fine paper, we’ve compiled a guide to timelines, pricing factors, and terminology. Here’s your roadmap to informed, stress-free conversations with your stationer so that your invitation becomes a cherished keepsake of your new beginning.
1: The Anatomy & Timeline of Wedding Stationery
Save the Dates–Single card that announces your wedding and gives guests ample time to plan, especially if they’re traveling.
- When to Order: 9–10 months before the wedding.
- When to Mail: 6–8 months before the wedding.
- What to Include:
◦ Your Names
◦ Wedding Date
◦ City and State
◦ The phrase “Formal invitation to follow.”
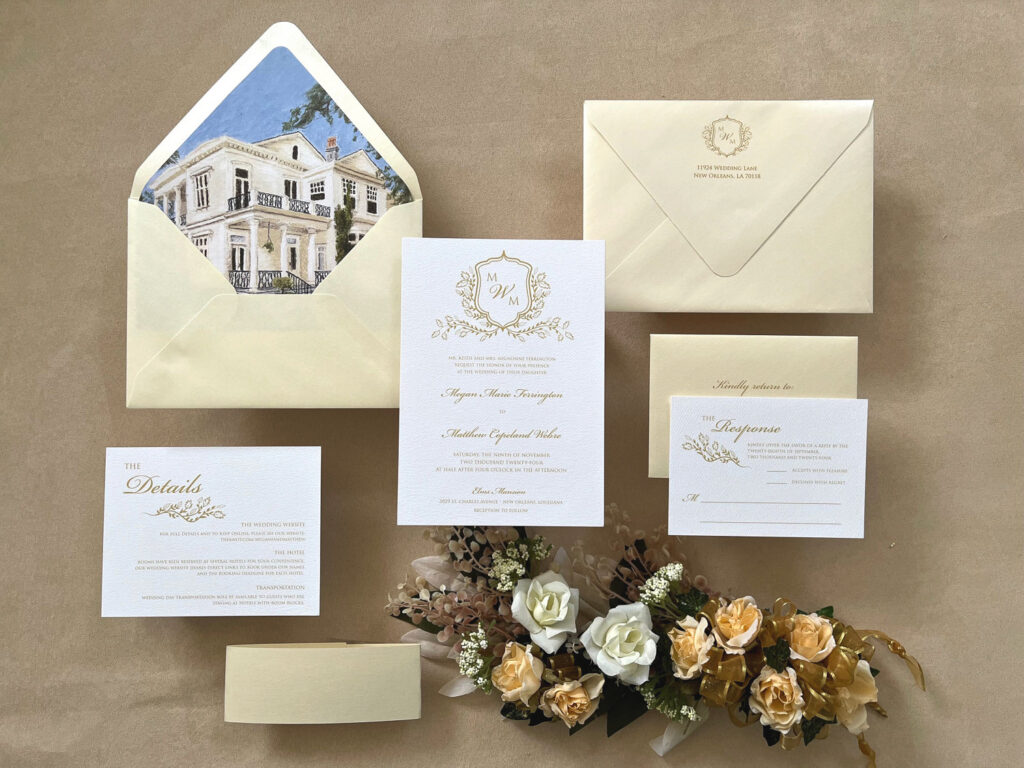
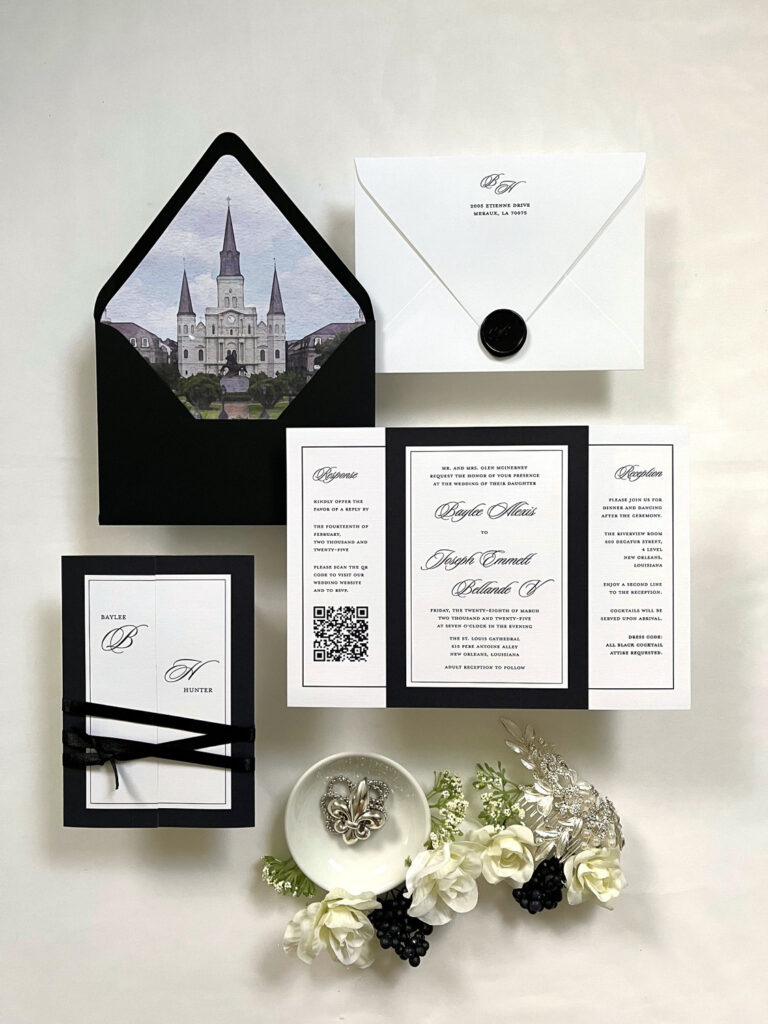
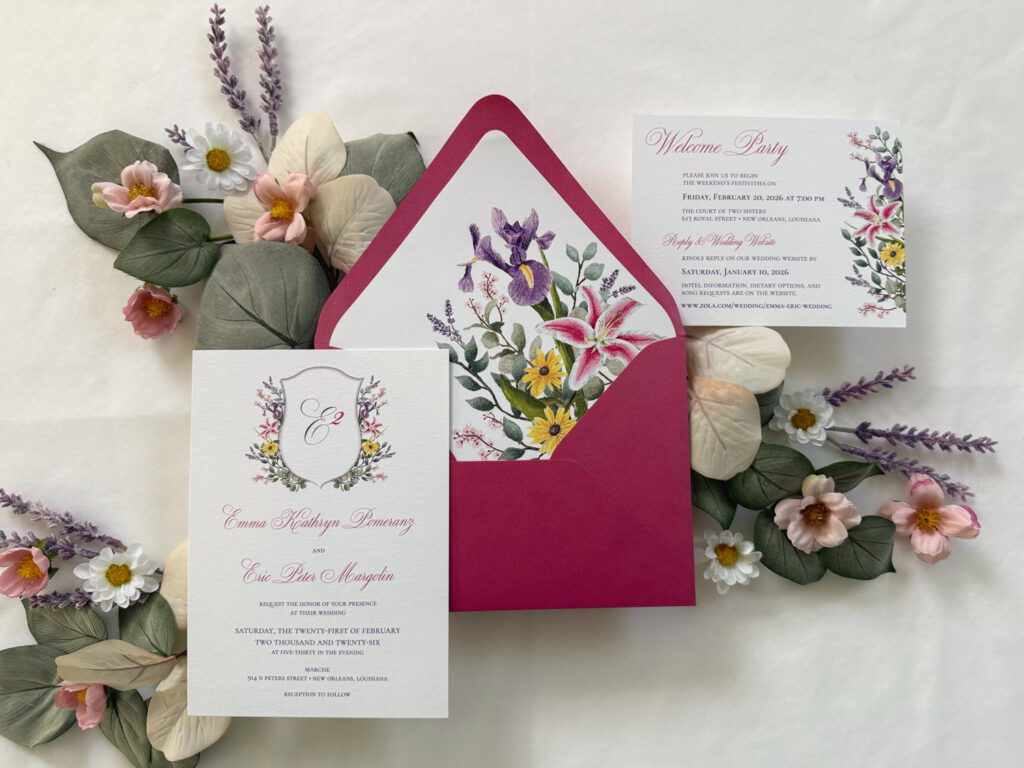
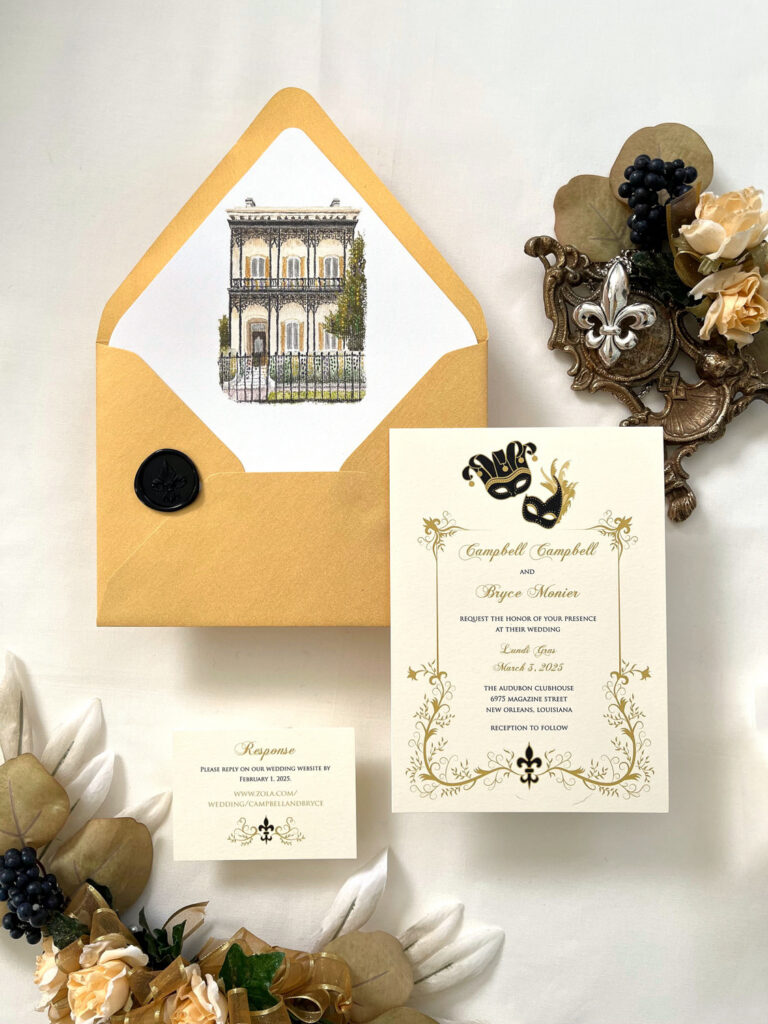
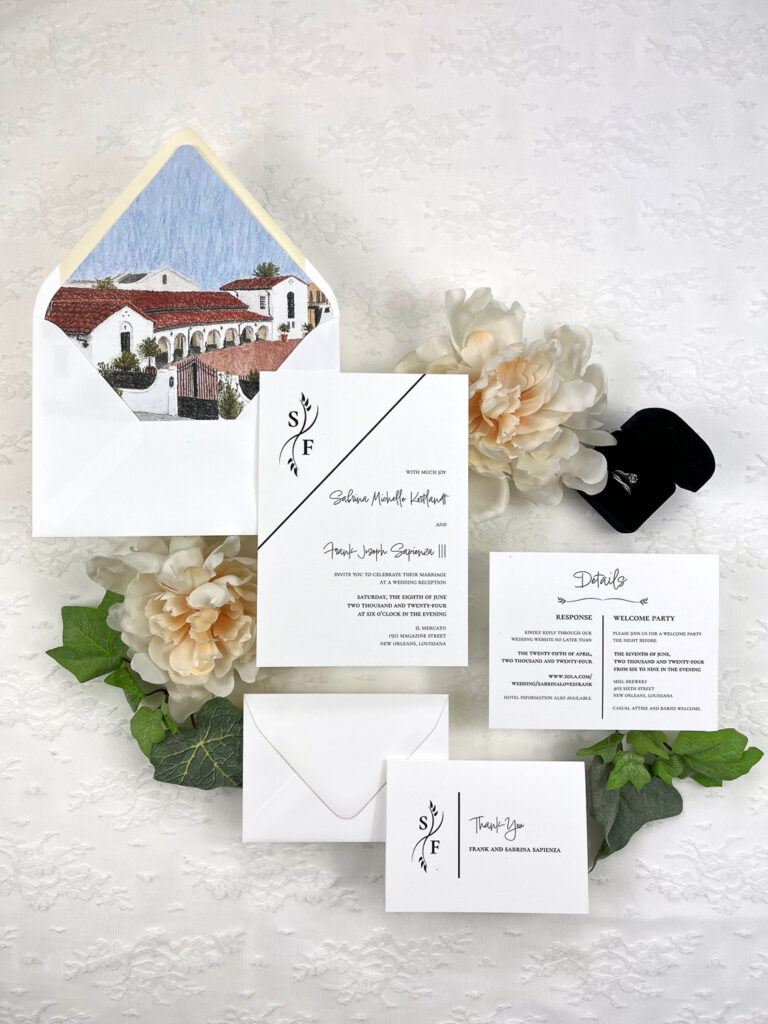
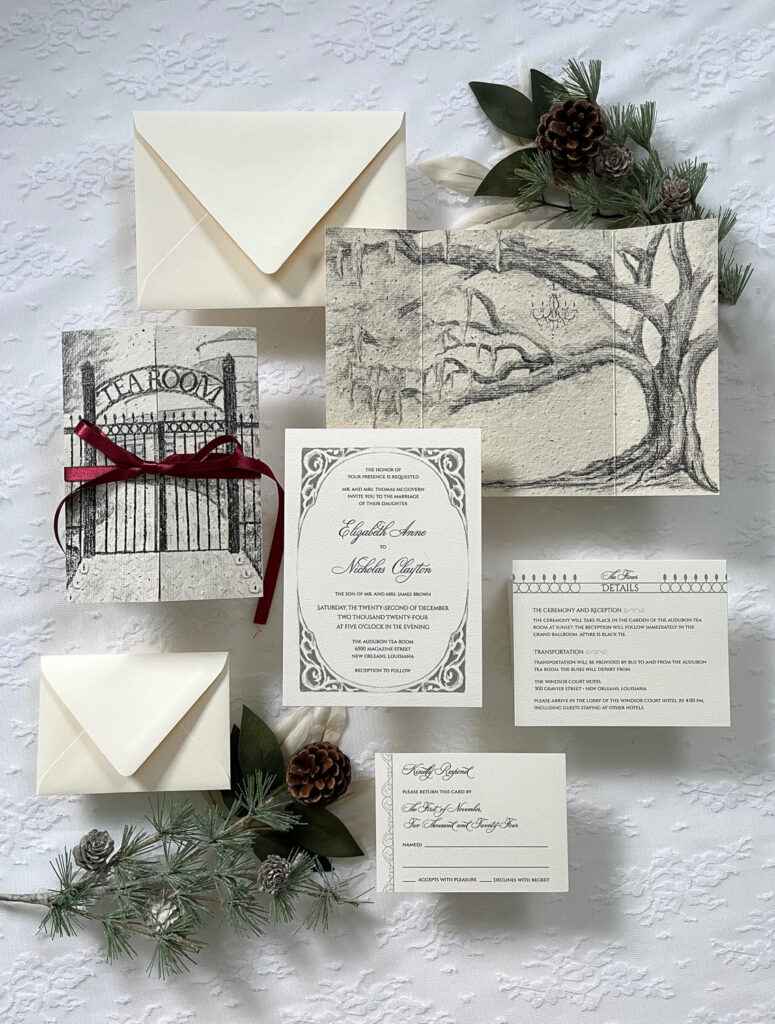
The Invitation Suite–Multi-card formal invitation that shares all the logistical details. May include multiple embellishments, add-ons, and artwork depending on your taste and budget.
• When to Order: 6–8 months before the wedding.
- When to Mail: 8–10 weeks before the wedding.
- What Cards to Include:
The Invitation Card– The largest card of your suite containing the formal request for
your guests to attend. Include host names, couple’s names, date & time, ceremony venue & address, and “Reception to follow.”
The Insert Card (AKA Details Card) – The “catch-all” card for logistics. You may include your wedding website URL, RSVP request (if responding online), reception venue & address (if different from the ceremony), hotel info, welcome party info, and/or dress code. If you have a lot to include, you may need 2 insert cards.
Single Mailing Envelope with guest and return addressing.
Optional Pieces:
Response Card with Return Envelope (AKA RSVP Card) – Asks guests to accept or decline the invitation and return their RSVP by mail. A formal and traditional piece. Return postage and return address should be included on the envelope.
Inner/Outer Envelopes–Nested mailing envelopes. The outer envelope protects the inner envelope, which may be more ornate. Formal and traditional option.
Thank You Notes–Small card sent after the wedding to thank guests for gifts and attendance.
- When to Order: Same time as your invitations.
- When to Mail: Within 3 months after the wedding.
Day-Of Stationery (AKA Wedding Day Stationery)–Any paper goods used on the day of your wedding. It provides guests with a seamless experience and serves as functional decor. What you need varies depending on your celebration.
- When to Order: 2 months before the wedding.
- What You May Include:
◦ Signage Types: Welcome, “Unplugged Ceremony”, Bar, Guest Book, Directional, Favors, Gift Table, Reserve Table, etc.
◦ Dinner Stationery: Namely for seated dinners, may include seating charts or escort cards, place cards, menus, and table numbers.
◦ Programs: Optional item, though recommended for long ceremonies or for ones that feature religious or cultural traditions that guests may not be familiar with.
- Vow Books: If you write your own vows, use these for your notes during the ceremony. They make wonderful keepsakes.
Part 2: The Three Investment Factors
1) Quantity: This is straightforward. However, you may get quantity breaks or bonus inclusions for higher quantities. If you’re planning an intimate wedding, ask your stationer about minimums.
2) Material Quality: See Glossary of Paper, Printing, & Add-Ons at the end of this article.
3) Level of Service: This is the biggest differentiator. Understanding which tier fits your needs will put you on the best path for success.
Level 1: Print on Demand Invitations & Digital Templates – Think large online retailers like Minted, Etsy, Canva, Zazzle, etc.
- Hands-On Support: ⭐️⭐️
- Design Flexibility: ⭐️⭐️
- Investment: $-$$
- Your Purchase: A pre-made design template that you edit and manage yourself. Print on demand sites include printing, but digital templates leave you to source your own printing.
- The Experience: Support is limited to technical issues with the website or production/shipping. There’s no one-on-one support for etiquette or design, and production options and customizations are limited.
- Who It’s For: If price is your primary concern, or if you are comfortable handling design and quality control on your own, this is a suitable economy option.
Level 2: Semi-Custom Invitations – This is the “happy medium” between a template and a bespoke suite, where boutique stationers design and sell invitation suites in their signature style and work with couples to make each invitation unique.
- Hands-On Support: ⭐️⭐️⭐️⭐️
- Design Flexibility: ⭐️⭐️⭐️
- Investment: ($$-$$$)
- Your Purchase: Partnership with a stationer and one of their existing invitation designs, personalized and produced for you.
- The Experience: You gain a professional relationship with a designer who offers peace of mind by answering your questions, guiding you through the design process, and handling production. In the end, you receive a high-quality invitation that is tailored to you.
- Who It’s For: Couples who want a polished, upscale look and expert guidance without the time or financial investment of an original design commission.
Level 3: Custom Invitations (Bespoke) – This is the “couture” option. You commission a designer to create an original design from scratch, specifically for your wedding. This may also include custom artwork, such as venue illustrations, crests, or monograms.
- Hands-On Support: ⭐️⭐️⭐️⭐️⭐️
- Design Flexibility: ⭐️⭐️⭐️⭐️⭐️
- Investment: ($$$-$$$$)
- Your Purchase: An invitation designed and produced to your desires and specifications.
- The Experience: You receive the highest level of personal attention. The investment includes a design fee to cover the artist’s time and creativity, plus production costs. It allows for nearly unlimited possibilities to match your unique vision.
- Who It’s For: Couples who view their stationery as an heirloom and want their stationery to embody the heart and vibe of their wedding.
Part 3: Glossary of Paper, Printing, & Add-Ons
Once you have selected your service level, the fun part begins: choosing the materials. Here is an overview of common stationery terms.
Paper:
- Card Stock ($): Heavy-weight paper that comes in a variety of textures: smooth, eggshell, linen, felt, and more. You may also see it offered in bright white, off-white, and cream colors. It is the baseline for most quotes.
- Colored Paper ($): Mid-weight paper that may be used for almost any stationery component to bring personality and warmth to a design.
- Vellum ($$): Translucent paper that is usually reserved for embellishments such as an invitation jacket or belly band. Digital and white ink printing only.
- Cotton Paper ($$): An upgraded card stock made from cotton fibers rather than wood pulp. It’s softer to the touch, eco-friendly, and exudes luxury. Best for letterpress printing, although it can be used with other processes.
- Double-Thick ($$-$$$): Two sheets of cardstock or cotton paper pressed together. This adds significant weight and drama to even the simplest design, though it may increase postage costs.
- Handmade Paper ($$$$): The “crowning gem” of paper. It features a deckle edge and a textured, organic surface. Reserved for high-end suites, most often with letterpress or hot foil stamping print processes.
Printing Processes
- Digital Printing ($): The most economical and common method. It is a flat, full-color print process (like a high-quality home printer) that works on most standard papers.
- White Ink ($$): A specialized flat printing process where solid white ink is used on dark paper stocks, creating a striking contrast.
- Thermography ($$): A traditional method that uses heat to create raised ink. It allows guests to feel the lettering but is often more affordable than foil or letterpress.
- Foil Stamping ($$$): Similar to letterpress, but uses a heated die to stamp metallic foil into the paper. It adds a glamorous “pop” and works beautifully on both white and colored papers.
- Letterpress ($$$$): The oldest, most traditional method. A custom die presses ink into the paper, creating a deep, tactile indentation. It looks best on soft, thick cotton paper.
Add-Ons: The Decorations
- Belly Bands ($): A simple strip of paper used to hold the invitation suite together. A functional and cost-effective way to keep your inserts organized.
- Envelope Liners ($): Decorative paper glued inside the envelope flap. Often used to display venue illustrations, floral patterns, or other artwork. Most economical “show-stopper” element.
- Ribbon ($-$$$): A more elegant alternative to the belly band, although more time consuming to assemble. The cost varies depending on material, with satin and faux silk on the lower end and velvet and real silk on the higher end.
- Wax Seals ($$): An artistic design hand-pressed into wax with a metal stamp. Used to seal gate cards or envelopes and makes a rich addition.
• Gate Card, AKA Wrap or Jacket ($$$) – Folded card that wraps around the invitation suite like a cover, opening at the center. It offers guests a literal “unwrapping” experience. May be made from vellum, colored paper, or standard cardstock and often prominently features artwork. - Deckle Edge ($$$$) – Filed or torn edges on cotton paper to give a vintage, hand-made look. Emulates the natural deckle edge on handmade paper, which is the soft edge that occurs during the production process.

Related Posts


Comments (0)